Fitting Roof Truss Clips
.jpg)
Pitched Roof Insulation Roof Truss Fixings

Truss Clip 38mm Ref Ctc38

2x8 Rafters Are Secured With Hangers Hurricane Clips Outdoor Pergola Curved Pergola Pergola

Tcp Harmony Timber Uk And Ireland

How To Nail Shed Roof Trusses To Top Plates Shed Roof Roof Trusses Roof Construction
How To Select A Connector Series Hurricane Tie Simpson Strong Tie Structural Engineering Blog

How to install hurricane straps to a roof.
Fitting roof truss clips. This product s information may differ depending on the category of use. Climb a ladder near the corner of your roof and tape the end of your tape measure against the rafter using duct tape. Our third nail system is significantly stronger than the dual nail roof truss straps systems typically used and as a result will save you 25 to 30 percent on your homeowner s insurance premiums. As strange as it sounds roof trusses are designed to move as a unit to maintain the structural integrity of the roof.
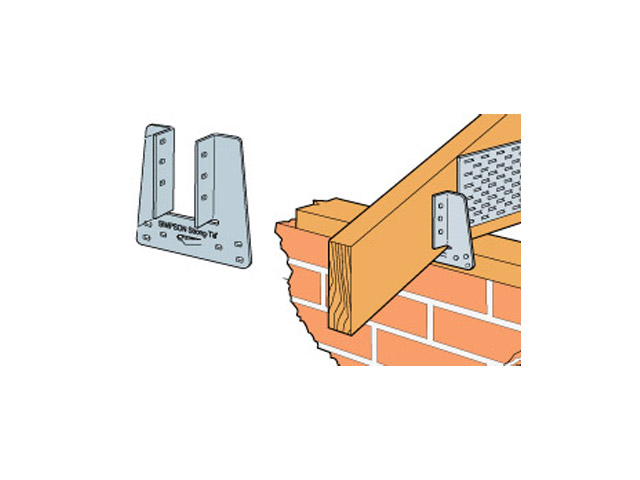
Insert the pre cut structural blocking to fit securely between the underside of the floor ceiling joist or roof trusses. Using 8 minimum self drilling screws secure the blocking to steel framing of 8d nail to wood framing using the pre punched holes. Insert a 6 cm 3 1 2 inch nail through the truss base where it sets on the wall plate. You are currently viewing details related to truss clips you can also view product information related to the category.
These clips work by further strengthening the bond between the roof and the walls of your house so the roof does not blow away in a hurricane. They are relatively inexpensive and if you want to install them by yourself then they just require a little bit of care and attention. Roof truss and rafter connectors ties and straps for cold formed steel construction. They are able to withstand winds of more than 100 miles per hour.
Insert an additional nail on the opposite side of the truss adjacent the previous nail. Part 1 preparing your roof to be secured. Hurricane roof clip installation hurricane tie down installation roof truss strap installation wind mitigation inspection. The easiest way to install hurricane straps is during the construction of the home.
Fluctuating temperatures and humidity can stress the truss. Pull the tape measure along the length of your roof and climb up the ladder in the new position to take your measurement. Get off of your ladder and reposition it at the other end of your roof. Drive the nail through at an angle beginning the nail 5 cm 2 inches up from the bottom of the truss.
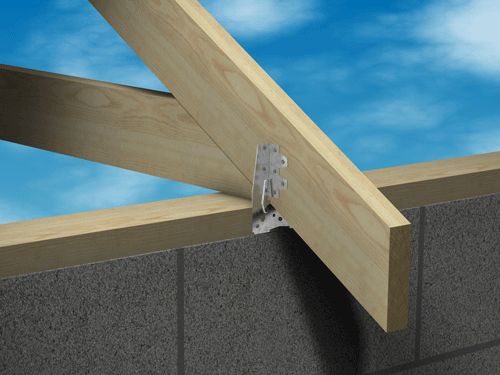
In such situation framing anchors or truss clips should be used. It is strongly recommended that for trussed after roofs the truss clip is used whether or not it is specified on the drawing. Skew nailing through the connector plate at the heel invariably results in splitting of the timber in the bottom chord.

Truss Rafter To Wood Double Top Plates Connectors For High Wind Resistance Building A Shed Shed Plans Framing Construction
38mm Truss Clip Galv Tc38 From Cookson Hardware

Fastenmaster Timberlok Vs Hurricane Ties New Youtube
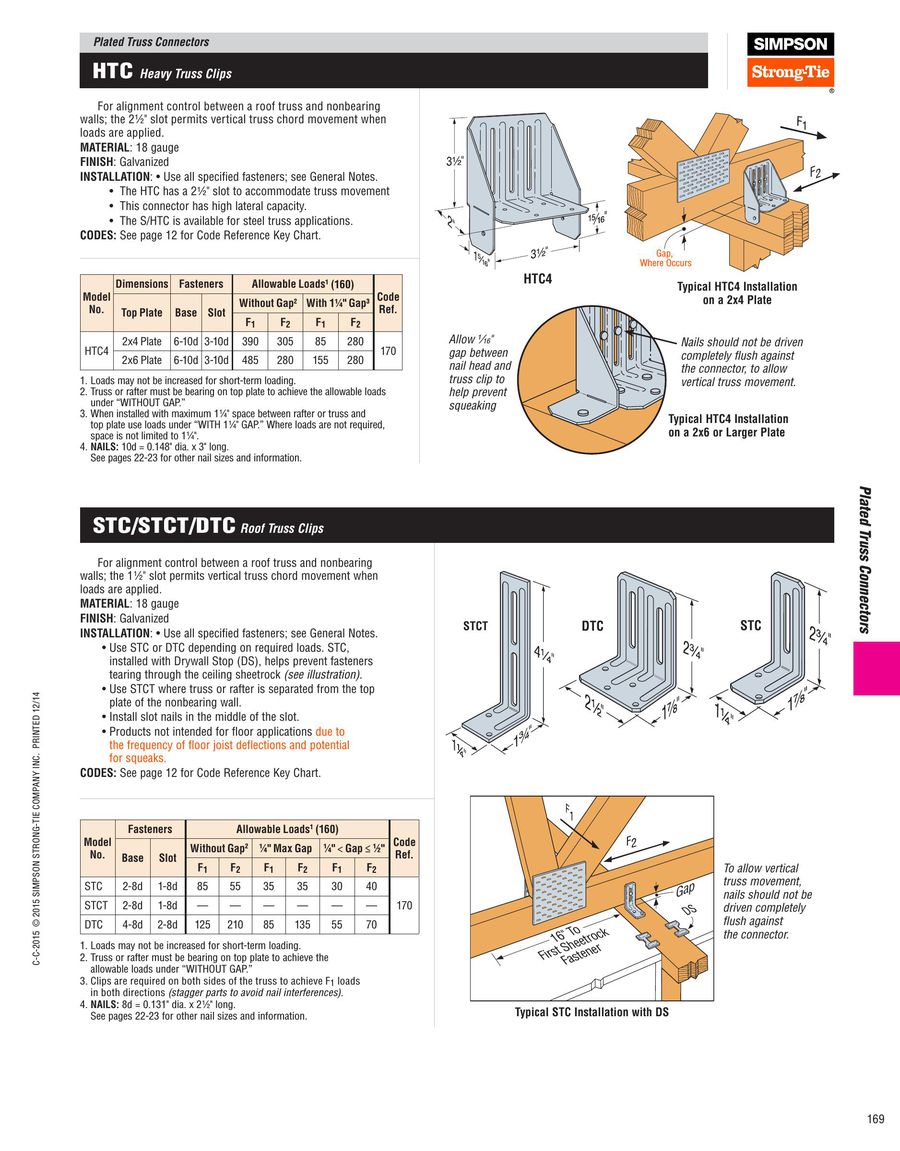
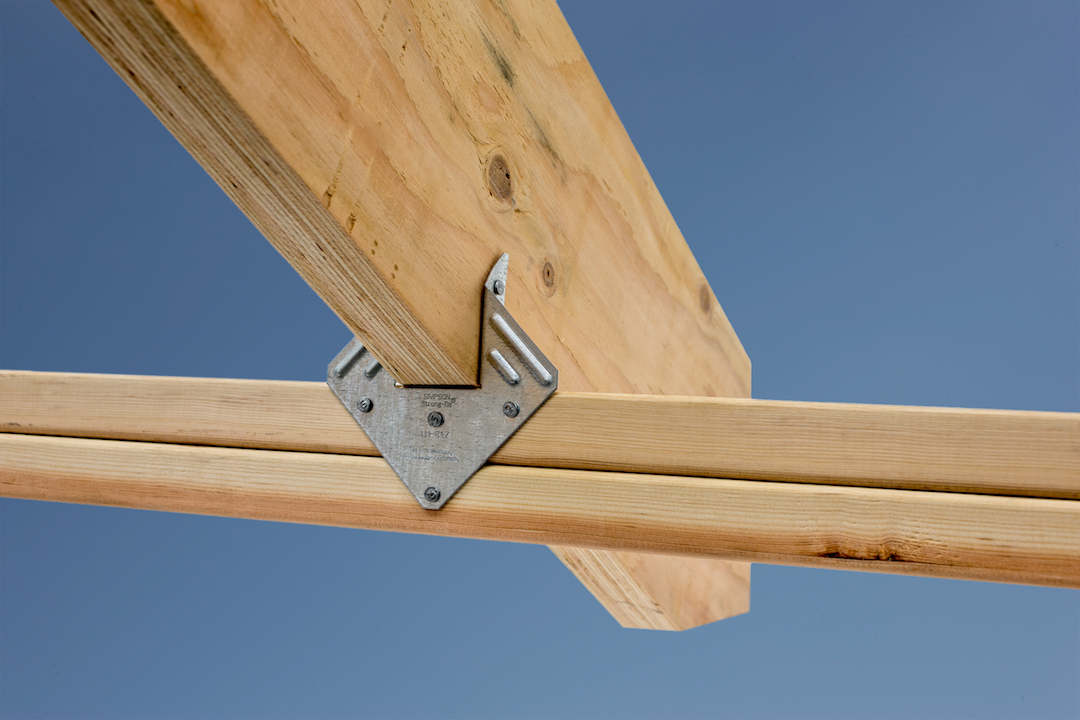
Heavy Truss Clips 2015 By Simpson Strong Tie

Truss To Top Plate Fixings Detail Youtube

Simpson Strong Tie H1 Hurricane Clip Hurricane Clips Hurricane Framing Construction

2 In Rafter Clips Ironwood 10pk Ozco Building Products Pergola Kits Outdoor Pergola Wooden Pergola

Hurricane Clips Fine Homebuilding

Simpson Strong Tie Stc Stct Dtc Roof Truss Clips Grade Industrial Supply

The 2x6 Rafters Were Installed And Additionally Supported With Rafter Clips Or Hurricane Ties Building A Wood Shed Backyard Sheds Building A Shed

High Wind Ties Diy Done Right Hurricane Ties Hurricane Clips Hurricane

Roofing Done The Right Way Extreme How To

Simpson Strong Tie Htc Nail 410 Lb Galvanized Heavy Truss Clip Hd Supply White Cap

7 2 6 Wall Plates Nhbc Standards 2020 Nhbc Standards 2020

Roof Truss For Sale Ebay

How To Install Roof Trusses Installing Roof Trusses Can Be A Tricky Business Roof Truss Design Roof Installation Roof Framing

What A Metal Tie In The Roof Framing Called Google Search Exposed Trusses Diy Ceiling Roof Framing

Hurricane Clips Reinforce Wood Frame Buildings High Wind Velocities From A Hurricane Cause Uplift Forces To Roofs Bre Hurricane Clips Roof Trusses Clip Frame
Https Encrypted Tbn0 Gstatic Com Images Q Tbn 3aand9gcqm6rijcixi5cafo8woocw973hpacgnjgbbrhcz20qqyn5psg Q Usqp Cau

Wickes 38mm Galvanised Truss Clip Wickes Co Uk

Deck Is There A Correct Orientation For Hurricane Clips Home Hurricane Ties Hurricane Clips Hurricane

Sabrefix Truss Clip Galvanised Dx275 95mm X 44mm 20 Pack Structural Fixings Screwfix Com
Simpson Strongtie Tcp38 50 Sst Tcp38 Truss Clips 38mm X 50

Tiny House 19 Install H1 Hurricane Clips Youtube

Construction Details Framing Installing The Roof Truss System Stock Photo Download Image Now Istock

Strengthening Roof To Wall Connections Jlc Online

4 In Rafter Clips Laredo Sunset 4 4 Clips In 2020 Pergola Plans Roofs Wood Tie Pergola With Roof

Roofing Diagram Eaves Cross Section Framing Construction Shed Plans Roof

Usp Tr Series 2 1 2 X 2 11 16 18 Ga G90 Galvanized Steel Double Slot Roof Truss Tie Hd Supply White Cap

Hurricane Strap Google Search Roof Trusses Hurricane Straps Building Design

Installation Of Wooden Beams At Construction The Roof Truss System Of The Frame House Stock Photo Download Image Now Istock

Ozco Building Products Ornamental Wood Ties Close Up Pergola With Rafter Clips Post To Beam In Laredo Suns Outdoor Pergola Ornamental Wood Pergola Designs

Ozco Ornamental Wood Ties Owt Hardware Is The Finishing Touch To Your Outdoor Or Indoor Project 1 1 2 In Hex Roof Truss Design Ornamental Wood Timber Frame

Simpson Strong Tie Truss Clip 100 X 47 X 0 9mm

Roof Trusses Truss Design Prices Uk Tailor Made Designs

How To Install Roof Trusses Safely At Height In 2020 Roof Installation Roof Trusses Installation

Installation Of Wooden Beams At Construction The Roof Truss System Of The Building With Frame From Thermoblocks Stock Photo Download Image Now Istock

Download How To Build Roof Rafters Plans Diy Garden Bridge Plans Download Shed Construction Building A Shed Shed Roof

Roof Trusses How To Repair Roof Trusses Types Of Roof Trusses Roof Trusses Roof Truss Design Roof Repair

Cedar Hip Roof With Exposed 3x8 Rafters Roof Truss Design Roof Trusses Roof Framing
Simpson Strong Tie Double Truss Clip Hd Supply White Cap

Roof Truss Cold Formed Steel Design Software Training

